

How To View Cobra Camera System On Internet
DVR Viewer Software Setup for Network / Remote Internet Photographic camera View
This folio has instructions on how to setup the remote security photographic camera / DVR viewer software for JPEG2000 DVRs. CCTV Camera Pros use to supply the dual codec JPEG2000 DVR, however, those JPEGs DVRs has been replaced by the latest Viewtron CCTV / Hard disk drive security camera DVR which works with analog CCTV cameras, HD-over-Coax security cameras, 4K BNC security cameras, and network IP cameras. You can still utilise the JPEG2000 DVR viewer setup instructions here.
Viewtron DVRs include the best remote photographic camera viewing apps for iPhone, Android, Mac, and Windows.
Remote Security Camera View from iPhone, Android, Mac & Windows Apps
The DVR software that was included with JPEG DVRs is called the integrated remote station (IRS). One of the applications in the IRS is a transmitter that allows you lot to watch your security cameras over the Internet or Intranet (internal network / LAN). The transmitter is meant to replace the DVR viewer that was used in the concluding version of the JPEG DVR.
The integrated remote station also lets yous review previously recorded surveillance video footage. The last version of the DVR viewer integrated remote station that was released can be downloaded here: Integrated Remote Station. The integrated remote station, also referred to as the DVR viewer software, runs on a Microsoft Windows based computer.
DVR Viewer Setup
Please follow these setup instructions to setup remote Cyberspace access for the dual codec JPEG DVR:Assign an IP Accost to your Surveillance DVR
In this department, nosotros will assign your surveillance DVR an IP address. Make sure that your DVR is connected to your network by attaching an ethernet cable to the dorsum of your DVR and attaching the other end to your router.
- Login to your DVR past pressing the bill of fare push on the DVR or on the wireless remote command.
- When y'all are prompt to enter a password, just printing the OK push button on the DVR or remote. The default admin countersign for the DVR is blank. If you accept already setup an admin password for your DVR, then enter this, and so press OK.
- From your DVRs System bill of fare, select External Device.
-
On the External Device menu, select TCP/IP Setup.
- On the TCP/IP Setup screen, select DHCP setup and printing enter.

- On the DHCP setup screen, ostend that the DHCP mode is set to automatic. If it is not, adjust it so that it is past pressing the OK button.
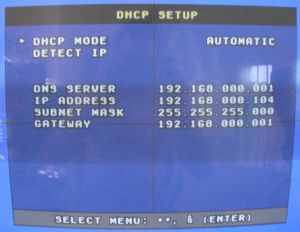
- Select Detect IP and press enter. The screen should refresh and populate values below. Note the IP address. This is the internal IP address that your router has assigned to your DVR. This is the IP address that you lot will setup port forwarding for.
- After you have noted this IP address, select DHCP Style and printing OK. The mode will be changed Manual. This will ensure that your DVR will always be assigned the same IP address from your router. THIS IS Of import because if you lot loose power to your router, your router may assign your DVR a divergence IP address and you volition no longer be able to access the DVR remotely.
- Press the menu button one time to return to the TCP/IP setup screen.
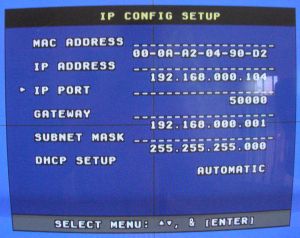
- On the TCP/IP setup screen, select IP config setup and press enter. On the IP config setup screen, confirm the port number of your DVR as seen below. The default port is 8000. If your DVR is not set to port 8000, please edit this value to set up to 8000. NOTE: please ignore that the below screen shot shows port 50000. Port 50000 was used for the final version of the JPEG DVR.
- Press the Menu several times on your DVR or remote until you exit out of the DVR menu system and see the alive view of your cameras.
Local Expanse Network (LAN) DVR Viewer Access
The Integrated Remote Station allows you to access your security cameras locally on your netork likewise as remotely over the Cyberspace. Before proceeding with remote Internet access, it is a skillful idea to exam out local access beginning. Too if you do plan on using the DVR viewer / Integrated Remote Station from on the same network as your DVR, you will go much better performance using your network'due south local IP accost
- Install the near recent version of the Integrated Remote Station past downloading it from our website here: Integrated Remote Station Download. This version is always the nearly recent and should exist used instead of the version that is on the CD that came with your DVR.
- Save the file "JPEG-IRS-Setup.exe" to your windows desktop or select run. This is the installation file to install the Remote Station on your computer. If yous saved the file, locate information technology and double click on it to begin installation. If you selected to run the programme, the installation volition begin after the file is done downloading.
- One time the installation is complete, an icon volition be created on your Windows desktop to launch the Integrated Remote Station. The icon will wait like this:

- Double-click on the icon to launch the programme.
- On the main IRS screen, click on the IRS Setup button.
-
On the IRS Setup screen, click on the Registering Site button. This will open a new Window where yous can add together the settings to connect to your DVR. This screen tin be seen beneath.
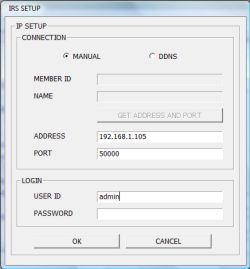
A) Select Manul for CONNECTION.
B) Enter the IP address that you previously noted from your DVR's TCP/IP setup screen in the Address field. Important: If any of the number fields in the IP address incorporate leading zeros, they should exist removed. For example, if your DVR's IP address is 192.168.000.066, you should enter 192.168.0.66.
C) Enter 8000 for PORT
D) Enter admin for USER ID
E) Go out the countersign blank if you did non setup a password on your DVR or enter your DVR password if you did set one upwardly.Printing OK when done.
- You should now see an entry created for the local area connection (Intranet) information that yous simply entered in the Site Setup list on the IRS Setup screen. Click on the entry that you but created so that it is highlighted in green then press OK.
-
On the main Integrated Remote Station screen click on the Transmitter push. This will open the DVR transmitter which is that new DVR viewer application. You tin note that as well in this list there are other awarding. Although this awarding replaces the DVR Viewer, you tin run across there is still a Viewer application bachelor. This is then that older legacy DVRs can still use the IRS awarding by using the DVR Viewer. Remember for the dual codec DVRs y'all should use the Transmitter because you will get amend performance as it takes advantage of the H.264 MPEG-4 video encoding built into it.
-
Once the transmitter awarding opens, the connection information that yous setup will be populated in the upper correct. Click on the Connect push button. The transmitter should fairly quickly connect to your DVR and display your security cameras.
-
If you are unable to connect, please become back and to this section and assign an IP address to your DVR.
-
If you are even so unable to connect, continue to the side by side section to setup port forwarding on your router and complete it, so try to connect again.
Setup Port Forwarding on your Router
Port forwarding needs to be setup on your router and so that a computer on the Internet tin communicate remotely with your surveillance DVR. Click here if you want to learn more almost how port forwarding works. Follow the below instructions to setup port forwarding.
Remember: Your DVR is going to use port 8000 (not 50000). 50000 was the default port for legacy non-dual codec DVRs).
If you practice not have 1 of the routers listed beneath, please consult the manual for the router that you have or call your Internet access provider (Internet access provider) for assistance if you are using a modem / router supplied by them. Tell them that you need to open up and forwards port 8000 to a DVR on your network.
- LinkSys Port Forwarding setup instructions
- D-Link Port Forwarding setup instructions
Setup static DHCP IP Accost
Although you previously setup the DVR to always request the same IP accost from your router when when you set up the DHCP setting to manual in the DVR configuration, it is yet a good idea to also configure your router to always assigns the same IP address to your DVR. Some routers support this feature and some exercise non. If your does not, it is OK to skip this department. The reason to set this up if you can is that if your router needs to be restarted or if there is a power failure, at that place is hazard that your DVR will exist assigned a new IP address. This will brand the port forwarding setup that yous just finished useless. Follow these instructions to setup a static IP address for your DVR.- D-Link Static IP Adress Setup
Remote Cyberspace DVR Viewer Access
These last three sections are needed to setup the remote Internet access to your security cameras. The starting time affair that should exist done to setup remote admission is to observe out if your Internet connectedness has a static or dynamic IP address. If yous do non know, please contact your Cyberspace provider and ask them. If you lot have a static IP accost, you can skip the adjacent 2 sections and spring to setting upwardly the Cyberspace connection to your surveillance DVR.
Creating and Configuring a Dynamic DNS Account
If your DVR will be connected to the Cyberspace using a dynamic IP address (most cable and DSL connections), yous need to setup a free service to manage the DNS (domain proper name service) for you and so that you can access your DVR remotely without needing to go along rail of your IP address. If y'all are unsure whether your Internet connexion uses a static or dynamic IP accost, please contact your Isp. If yous are using a static IP accost, you can skip this section and the next section "Setup Dynamic DNS on your Router". If you are using a dynamic IP address, click hither to setup your free dynamic DNS service . Render to this screen to continue after setting up your costless dynamic DNS service.
Setup Dynamic DNS on your Router
Dynamic DNS is used when the Internet connection you lot volition be using for your DVR uses a dynamic IP address. The settings that you setup using the DynDNS service will be added to your router'due south DDNS configuration to always proceed your IP accost up to date. The host name that you chose, something like "mydvr.dyndns.org", volition always be kept upwardly to engagement with the latest IP accost assigned to your Net connectedness by your ISP. This mode you tin can use your host proper noun to connect to your DVR remotely instead of trying to proceed track of your dynamic IP address. CCTV Camera Pros has DDNS setup instructions for D-Link and LinkSys routers. The instructions are based on certain models but are likely the aforementioned or close to the aforementioned for other models of D-Link and LinkSys routers. If you lot need specific instructions for you router, please consult the manual that came with it and look nether the section that has to exercise with Dynamic DNS back up. Almost modern router/switches back up dynamic DNS.
- LinkSys Router Setup - Dynamic DNS Service
Setup Cyberspace Connection to your DVR
The last step is to configure the Net connection in the Integrated Remote Station for access from outside of your local network.
-
If the IRS is not already running, please beginning it by double-clicking on the JM-IRS icon on your desktop:
-
I the main IRS screen, click on the IRS Setup button.
We will exist calculation a new entry for your remote Net connectedness. And so when you lot are finished, if you also setup the LAN connection, you will have two connection configured in the IRS setup. One for local access to your DVR and one for remote Cyberspace access.
-
On the IRS Setup screen, click on the Registering Site button. This will open a new Window where you tin can add the settings to connect to your DVR. This screen can be seen beneath.
A) Select Manul for CONNECTION.
B) In the Address field, enter the static IP address that your ISP gave y'all if you are using a static IP address. If y'all are using a dynamic IP address and finished setting upwards your DynDNS account, please enter the host name that yous setup when registering.
C) Enter 8000 for PORT
D) Enter admin for USER ID
E) Get out the password blank if you lot did not setup a countersign on your DVR or enter your DVR password if you did set ane upward.Press OK when done.
-
You should now come across an entry created for the Internet connection information that you just entered in the Site Setup list on the IRS Setup screen. Click on the Internet entry that you only created so that it is highlighted in green then printing OK.
-
On the chief Integrated Remote Station screen click on the Transmitter push button. This will open the DVR transmitter which is that new DVR viewer awarding. Yous can note that as well in this list in that location are other application. Although this awarding replaces the DVR Viewer, y'all can see there is still a Viewer application available. This is and so that older legacy DVRs can still use the IRS awarding by using the DVR Viewer. Call back for the dual codec DVRs you should employ the Transmitter because yous will get better functioning as it takes reward of the H.264 MPEG-four video encoding built into it.
-
In one case the transmitter application opens, the connectedness information that y'all setup will be populated in the upper right. Click on the Connect button. The transmitter should adequately quicky connect to your DVR and display your security cameras.
DVR Viewer / Transmitter Troubleshooting Techniques
-
Ensure that your internal IP accost to your DVR has not changed buy going through this department once again to a ssign an IP accost to your DVR. If your IP address changed, then you need to setup port forwarding rules over again based on that new IP address, so go here to setup port forwarding on your router.
-
Make sure that you accept the correct IP address for your Net connection. Enquire your ISP for your IP address if using a static IP address. You can also expect upward the IP address of your net connection here:
Get My IP Address
-
Make sure that your router does non accept any advanced firewall rules in place past consulting the manual.
-
Call your ISP and ask them if your modem has a firewall that y'all can disable.
-
Call your Internet access provider and make sure that they do not block any incoming ports to your Internet connection.
Recommended Photographic camera Viewing Apps and Software
You may be interested in in these mobile apps and desktop PC software that support remote security camera viewing.
- How to Lookout man Security Cameras on iPhone
- CCTV Viewer for Android
- Mac Security Camera Software
- CCTV Viewer - Remote Software for Windows
Related CCTV and Surveillance System Products
These are some of CCTV Camera Pros all-time selling products.
- HD Multiplexer - this CCTV video multiplexer works with the following BNC security camera types: analog CCTV, AHD, HD-TVI, HD-CVI.
- iDVR-PRO Surveillance DVRs - these are by far our best selling CCTV DVRs. They are "hybrid DVRs" that work with analog CCTV, AHD, and Hard disk drive-TVI blazon cameras.
- CCTV Cameras - many of our analog CCTV cameras also back up multiple HD security photographic camera modes. Users tin switch the camera to one of the Hard disk drive video modes when they upgrade their DVR to high definition.
- 180 Caste Dome Camera
- Turret Security Cameras
Source: https://www.cctvcamerapros.com/DVR-Viewer-Connection-s/227.htm
Posted by: perrysirainclont.blogspot.com
0 Response to "How To View Cobra Camera System On Internet"
Post a Comment